August 31, 2010

Eclectic Whatnot

So what do you say we start off this lovely Tuesday
morning with a giveaway to the fabulous etsy shop:
Photobucket
Not long ago,
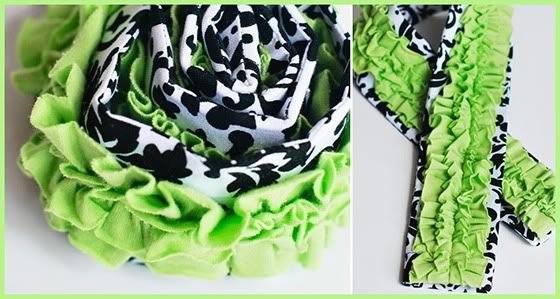
I won this pretty little ruffly camera strap you see below,
and I am totally in love with the thing. It makes me feel all
pretty even when I look like I haven't showered in days.

Photobucket

You mommas with small children know how that goes.

So, who wants to win a pretty camera strap?

Ruthanne, the owner of Eclectic Whatnot, is generously
giving away a $25 store credit to her Etsy shop!

Here's what you gotta do to win:

1. Head on over to Ruthanne's Etsy shop by clicking here. Come back and
leave me a comment telling me which camera strap you would love to have.

For extra entries:

2. Follow Ruthanne's blog.
It is by far one of my favorite daily reads!
She is a hoot!

3. Follow my blog.
Do you already follow? Please let me know.

4. Tweet or blog about this giveaway.

5. Tell me what your favorite thing about Fall is.

So you have FIVE chances to win!
Note: Please leave a separate comment for each entry-- thank you!

Giveaway will close Sunday {September 5th} at 10 pm.

Good luck!

Photobucket
p.s. I did not receive monetary compensation for this giveaway. :)

August 30, 2010

Somebody...

Photobucket

has discovered...

Photobucket

where Mommy's secret...

Photobucket

stash of suckers are.

Photobucket

August 29, 2010

Blog Button

I'm back with another blog tutorial. Aren't you excited? I am going to teach you today how to make your very own blog button. And really, it is a simple thing to do. Seriously, if I can do it {without the help of the hubby...yay me}, then you can too! The only thing is, you must have some sort of graphics program such as Adobe Illustrator or Photoshop to make one {unless there are other programs out there that I am unaware of}. Photoshop is my baby. So we will use it for this tutorial.

"What is a blog button for?"

Good question! So glad you asked.

Basically, blog buttons are made to help promote your own site on other blogs. Another reason to have a blog button is to advertise your company {such as an etsy shop}.

Here is my little ol' blog button; I created a few weeks ago. It's kind of simple, but I really like it.
Photobucket
So, are you ready to make yourself one?

Let's get started.

1. Create Your Canvas:
A typical size is 150×150 pixels, but you can make it whatever size you like. I made mine 200x200 pixels, and it was a perfect fit on the side of my blog. Just play around with the size until you find the right size for your blog. I'll share one of my little secrets with you. I didn't create the cute little canvas below. I googled "free digital scrapbooking kits," found a cute one, downloaded it, and then opened up this pretty little design in Photoshop.

Photobucket

2. Add Text:
Decide what you want it to say, and keep it short and sweet so that it is easy to read. Create a text box and then type your text inside.

Photobucket

Then choose a pretty font. You can also change the color of your text if you'd like. I wanted my button simple and very easy to read, so at this point, I was done!

Photobucket

Note: You can also add a photo or an illustration to your button if you want a little more detail. Once you select a photo or image, place it in the box, and then play around with the words and the image until you like the way it looks. Once you are finished and like the way your button looks, save it as a .gif image. This is a very important step, because if you save it as a jpeg, it won't work.

Okay, so now that you have your button created, upload it to either Photobucket or Flickr {whichever you prefer}.

Now, let's learn how to create the box under the button with the link in it and also how to place it on the side of your blog.

Here is the code you will need:


1. You are going to replace "http://YOURBLOGADDRESS.com" in the hyperlink reference above with the URL of the webpage you want your button to link to. Make sure you put it inside the quotes.

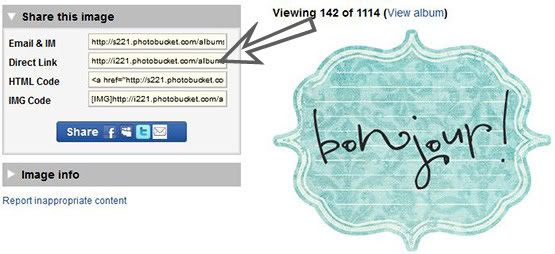
2. Go back to Photobucket or Flickr {wherever you uploaded your button image} to get the direct link to your image.

Photobucket

3. You will now replace “http://YOURBUTTONLOCATION.jpg” in the sample code above with the URL to your image {the direct link you copied}. You will do this twice, as you can see there are two "http://YOURBUTTONLOCATION.jpg" in the sample above.

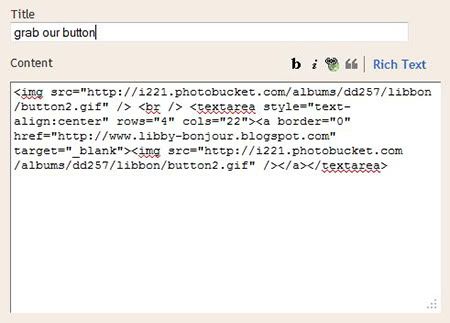
Here is an example of what my code looks like:

Photobucket

Now you are ready to insert your new button on your blog sidebar!

1. Go to Blogger:: Edit Layout
2. Click "Add a Gadget"
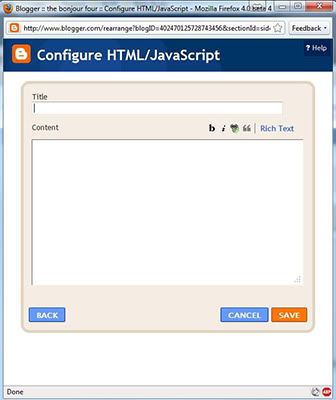
3. Add a HTML Gadget {4th one down from the top}. It should look like this:

Photobucket

4. Now copy your code and paste it like this:

Photobucket

5. Click save and you should have a pretty little blog button on your sidebar. Yay!

Shoot me an email if you encounter a problem! Like always, I will be more than happy to help you figure out what went wrong.

Now go get busy and make some pretty blog buttons!

Photobucket

p.s. Thank you Gina for sharing the blog button code with me!

August 28, 2010

Project#1

So I just have to say, I am lovin' Home Ec!
How about you? Have you started yet?

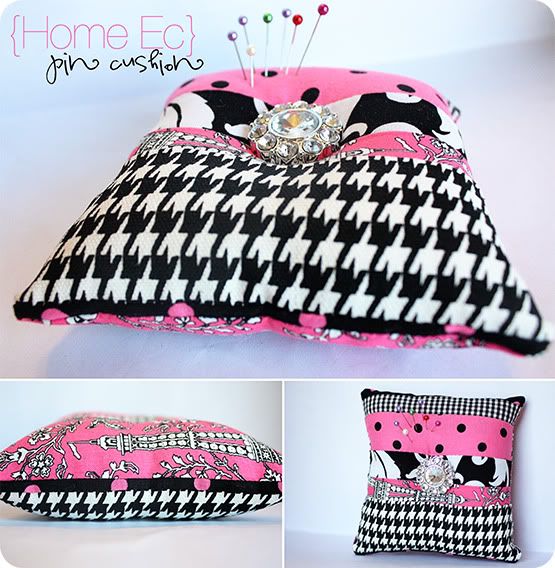
I finished my first project {finally!} this past
week while visiting my momma in Oklahoma:

Photobucket

What do you think?
Not too bad for my very first sewing experience, huh?

The pin cushion was a little tedious,
{not sure I'd want to make another one}, but
seeing it all come together in the end was fun.
And now I can say I know how to make a pin cushion!

Mom, thank you for taking the time to teach
me the ins and outs of my new sewing machine
and for helping me pick out all of my sewing supplies.
I would probably still be trying to figure out how to
thread a bobbin if I were here trying to figure
out all of this stuff by myself.
I loved every minute of our time together! Muah!

I am so excited to get started on my next project!
Here's a little sneak peak of the fabrics I picked out for it:

Photobucket

In fact, I think I might get off this
computer right now and get started on it!

Hope you all are having a great weekend so far!

Photobucket

August 27, 2010

Happy Birthday, Noah!

Two years ago today, we met you for the first time:


Where has the time gone?

Seems like just the other day, we were snuggling & loving
on our sweet little bundle of joy in the hospital room.

Today, we celebrate your 2nd birthday!
Such a big boy!

Photobucket

Psalm 127:3
"Children are a gift from the Lord;
they are a reward from him."

You truly are a gift from the Lord;
what joy your bring to our lives.

Happy Birthday Noah Bear.
We love you sooo much!

Photobucket

August 26, 2010

Project Nursery

Are you in need of a little inspiration when it
comes to decorating your baby's nursery?

Well, let me introduce you to:
Photobucket

This blog is one of my absolute favorites.
I could literally browse this site for hours...

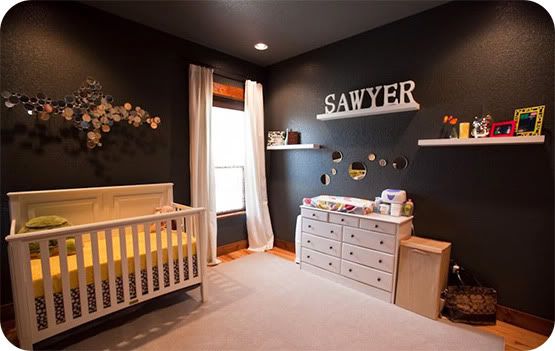
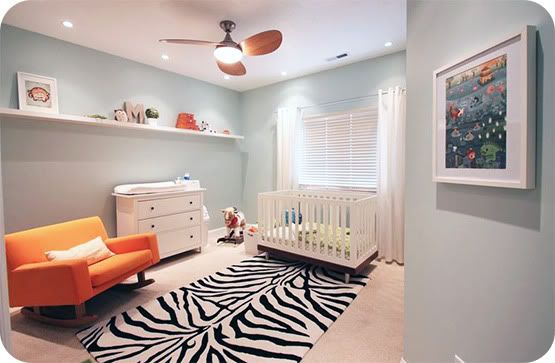
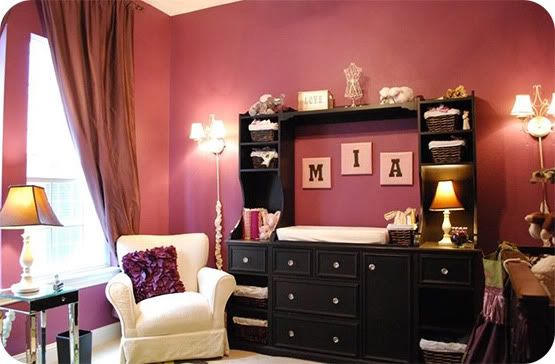
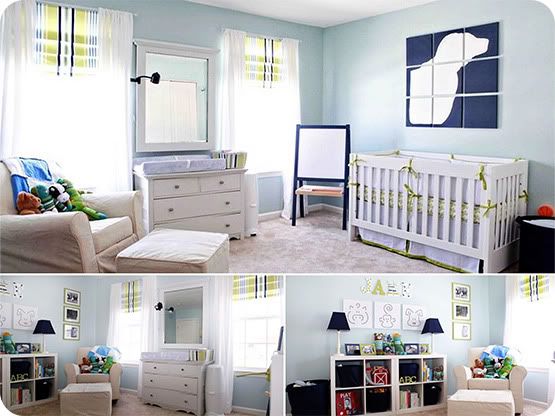
Take a look at some of Project Nursery's eye candy:

Photobucket
PhotobucketPhotobucket
Photobucket
Photobucket

The nursery gallery is full of unique and gorgeous designs
you can tweek to create your very own Project Nursery.

You can even upload your nursery to the gallery
to inspire others and show off all the hard work
you put into preparing for your little one.

Project Nursery is a fabulous blog,
so head on over and get inspired.

Photobucket
p.s. For those of you with inquiring minds,
no, there is not a little Bonjour in the oven. :)

August 25, 2010

A Noah Face...

Photobucket

... I always want to remember.

This is the face Noah makes
when someone is trying to get
him to smile or if he's trying not
to laugh about something.

I just love it--he is too cute!

Photobucket

August 24, 2010

Striped Paper Straws

Photobucket
I have a new obsession: striped paper straws.
Aren't they fabulous?!

Photobucket

They are the perfect way to make any drink fun & festive.

Photobucket

The gray straws are definitely my favorite.
But I'd take any of the colors; they're all so cute!

Photobucket

And guess what? They are super cheap!
You can buy a box of 50 for $3 here.

Which color is your favorite?

Photobucket
{image found here, here, & here}

August 23, 2010

I Want Rock Eyes...

Photobucket


Oh, so cute!
Photobucket

August 22, 2010

Longing

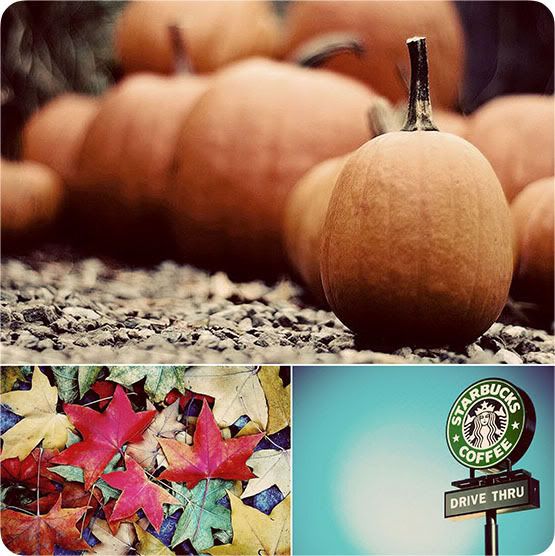
I am definitely ready to say goodbye to Summer. We've had lots of fun, but I am so over these terribly hot days.

I'm ready for... pumpkins... warm Starbucks coffee... the falling of the beautiful leaves... cooler weather... scarves... snuggling...

Oh, how I long for Fall.

Photobucket

Are you dreaming of Fall?

Photobucket

August 21, 2010

Raising a Reader

Photobucket

Tips to Get Your Child off to a Good Reading Start:

1. Read to Your Baby: It’s never too early to introduce your child to books. “Read” board books to your infant, put cloth books in the crib, and float plastic books in the tub. Your kids will grow up with the idea that books are an integral part of their lives.

2. Make Time For Books: Set aside a specific time to read to your child everyday. Naptime and bedtime are obvious opportunities, but some busy families find that a story over breakfast or while lounging in the tub works best for them.

3. Keep Books Available: Make it easy to read. Keep a sack of books in the car to divert kids while you’re running errands and on the nightstand to amuse early risers. Pack a variety of books when traveling.

4. Be a Reading Role Model: Show your kids that you value reading. Let them see that you are reading for pleasure, and tell them how much you enjoy reading with them. Take them along on trips to the library and bookstore.

5. Make Your Own Books: Preschoolers can dictate their own stories and then add illustrations. Other ideas? Make a holiday book that shows your family traditions, a birthday book recording party memories, or a travel diary about the family vacation.

6. Read Anything and Everything: On the road, encourage your child to read the Stop, Yield, and Walk signs. In the grocery store, ask the kids to find the juice or cereal they want. Learning to differentiate among packages and to recognize common road signs is a great beginning step in learning to read.

7. Play with Letters: Magnetic letters allow children to spell their name on the refrigerator. Letter blocks combine stacking and spelling for double the fun.

8. Read it Again and Again: Parents may get tired of reading the same favorite book over and over, but repetition is an important developmental step in learning to read. As they repeat the familiar refrains with you, children begin to associate the words they say with the words on the page. Soon they will be recognizing and reading the words on their own.
source

Photobucket

August 19, 2010

I'm a Pug, Not a Beanbag!

Oh, Einstein...

Photobucket

Bless your sweet little heart.

Photobucket

August 18, 2010

Home Ec

I remember saying not long ago that school was a thing of the past for me. Well, apparently I lied. Today I enrolled myself in The Freckled Nest's Home Ec class to learn to sew. Tis' true. I can hardly believe it myself. And, the crazy part is that I am really, really, reallllly excited about it.

Photobucket

What sparked this new interest in wanting to learn to sew? Yeah, I have no idea. I mean, I grew up watching my mom sew, and it never interested me much--until just a few days ago. Now all I can talk about is sewing and this class I signed up for. Hmmm.

Anyway, I wanted to share a little bit about the class with you because our lovely teachers have extended the registration sign up until today {August 19}. So, if you are like me {no sewing experience whatsoever} and have an interest in learning to sew, this class is probably a good place to start. Plus, we could be classmates. How fun would that be?

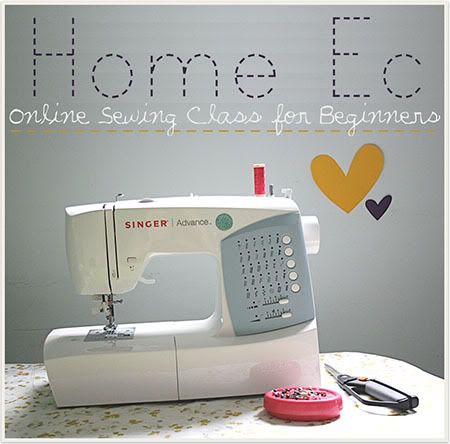
Home Ec is an online sewing class for beginners and those wanting to develop their sewing skills. It is a 'take it at your own pace' kind of class, and it includes three guides, 26 totally useful projects that each teach you a new sewing skill, and even a Tips lesson on how to invent and adapt projects of your own. The website is full of useful resources and covers topics like how to work your sewing machine {that would be a good place to start!}, hemming, troubleshooting problems, how to take care of your machine, and how to find your way around a fabric store.

Are you sold yet?

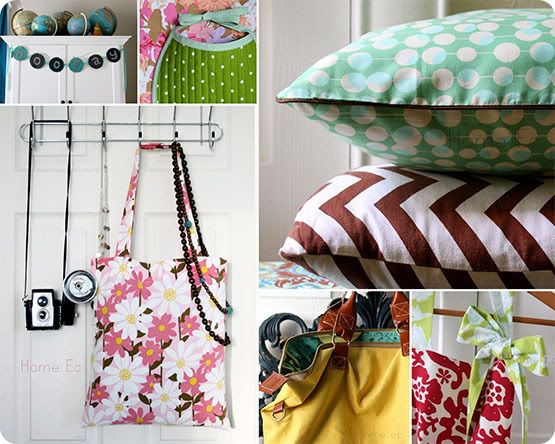
Here are a few of the cute sewing projects lined up that I'm most excited about:

Photobucket

I can hardly wait to get started and show you my finished projects! But promise me one thing, will ya? Promise you will tell me how beautiful they look even if you think they look like total crap, okay? Thanks.

If you are interested in being my classmate, then hurry up and get registered. They will be closing registration soon. Note: This is a one time class; they will not be offering it again.

Click here to learn more about Home Ec.

Photobucket

p.s. Did you miss my recent tutorial on rounding the corners of your pictures? Click here to read it. And for those of you who followed the tutorial, I want to see some rounded corners! Leave me a link to your blog in the comments below so I can check them out.

August 17, 2010

Don't Be Square

I am definitely not a pro when it comes to editing in Photoshop. I mean, I've barely touched the surface of all there is to learn with the program; it is so detailed. And they just keep coming out with newer versions of Photoshop with more editing capabilities. Crazy! Of course, by the time I start to get the hang of our current Photoshop, Josh upgrades, and then I'm at square one again. Anyway, as complicated at Photoshop can be at times, rounding the corners of your photos really is an easy process. And for those of you who do not have Photoshop, don't worry. I have another option for you that I will share at the end of this tutorial.

Okay, so let's get started.

First things first, open up Photoshop.
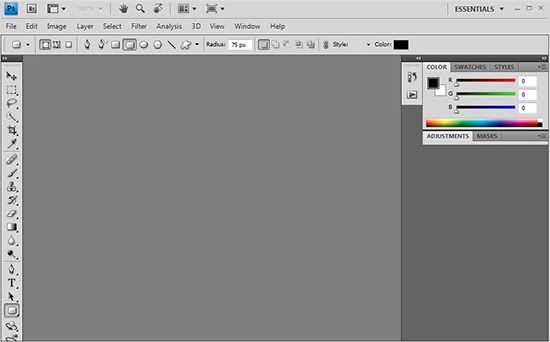
Photobucket

Okay, now that we have Photoshop open, click file and then open. Click on the picture you want to round the corners on, and then click open. Now we are ready to start rounding our corners.

Photobucket

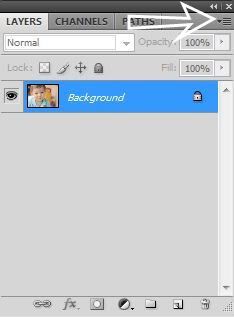
To give our photo the rounded corner look, we must first create a new layer. The box below will be on the right side of your screen. See where my white arrow is pointing to? Click the arrow in the layers palette.
Photobucket

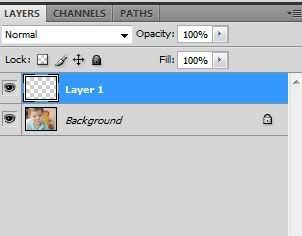
A box will come up with several options. Click the option that says new layer and then click ok. See our new layer above the background layer?
Photobucket

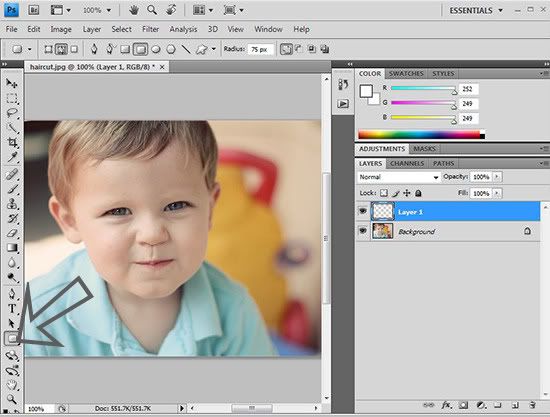
Now we are going to be using the rounded rectangle tool to create the smooth corners. My arrow is pointing to the button you will right click. It will bring up a box with several options. Click rounded rectangle tool.
Photobucket

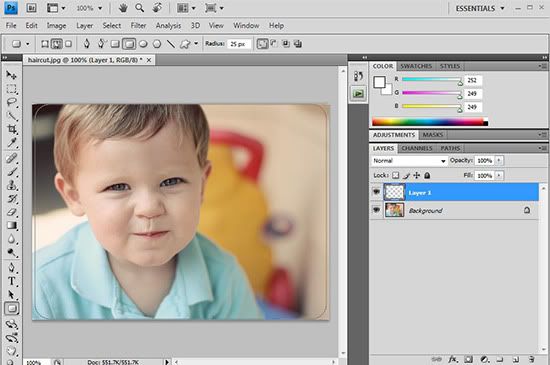
At the top above your photo, you will look for the word radius. In that box, change the number to 50 px. Note: sometimes you might need to change this number depending on how round you want your corners. The higher you make the number, the rounder the edges will be.

Next we are going to draw the shape layer over the photo. All you do is drag your cursor. It might be a little bit hard to see in my example, but if you look closely there is a light gray rounded rectangular shape over my picture.
Photobucket

Okay, now double click on the layer that is blue on the right side of your screen. A dialog box will show up. It will look like this:
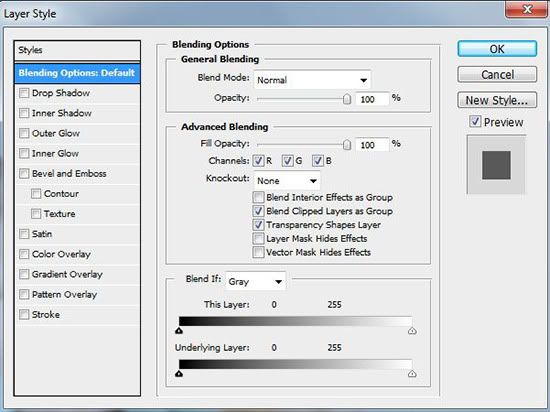
Photobucket

Under the advanced blending in the box, move the fill opacity slider from 100% to 0%. Then click ok.

We are almost done.

Now on the right, click the paths tab in the layers palette.
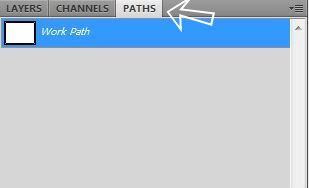
Photobucket

In the blue area, right click. A box with several options will show up. Click make selection and this little box will show up:
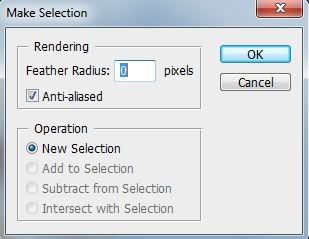
Photobucket

Before you click ok, make sure your feather radius is set at zero. Also, make sure the anti-aliased box is checked. Then click ok.

Now we are going to get the new rounded rectangle image in a new window. Click edit at the top of the screen. Then click copied merged.

Next click file and then click new. This screen will pop up:
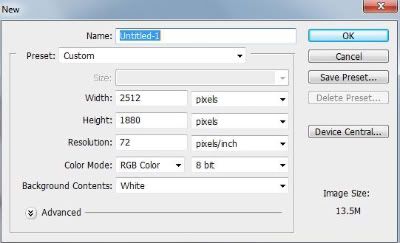
Photobucket

Click ok. Then go back up to edit again and click paste. Your image will be placed on the new document you opened and you should now have rounded corners like mine below!
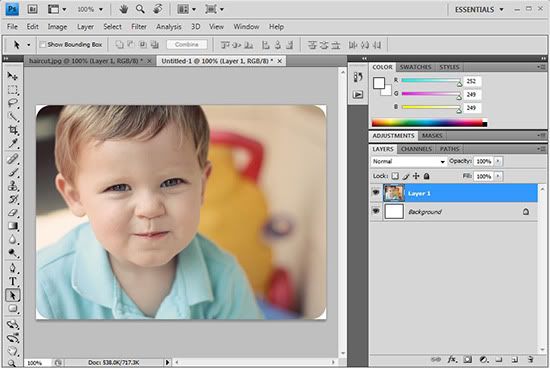
Photobucket

How did you do? Wasn't too hard, huh? At first it may seem a little tedious, but after you do one or two of them, you will be able to round corners in no time.

Now, for those of you who do not have Photoshop, roundpic.com is a free service that rounds the corners for you. Click browse, find the picture you want, and then click round it. Pretty easy.

Note: The corners of the pictures are not as smooth as ones edited in Photoshop {obviously}, but definitely not bad at all for an {free!} online service.

Again, if you encounter any problems or have any questions, don't hesitate to email me. I'll be happy to help!

Good luck and have fun rounding!

Photobucket