
It's been a while since my last tutorial, so I thought I'd share with you how to use digital tape in Photoshop. It may seem like a lot of steps at first, but after playing around with the tape a few times, you will find that it's super easy. I use Photoshop CS4. If you have an older or newer version, you'll find some differences, but you should still be able to follow this tutorial.
Need some digital tape? Here ya go! Let's get started.
1. Open up Photoshop.
2. Click file > open, and locate the picture you want to use. When you find your picture, click on it and then click open. Note: I always save mine to the desktop so it's easy to find.
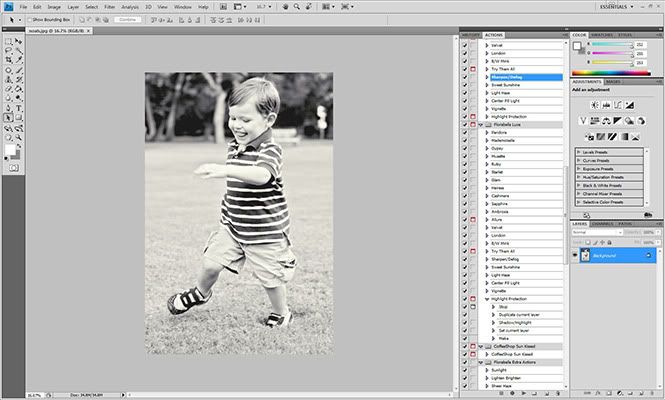
3. This is a screen shot of the picture that I opened up in Photoshop:
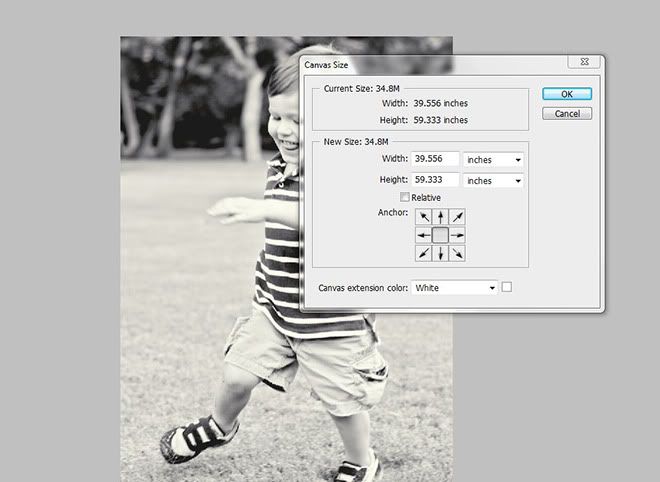
4. On the toolbar at the very top, click image and then click canvas size. A box will pop up like the one in the screenshot below:
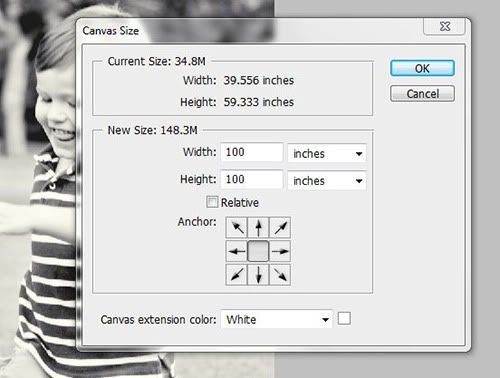
5. For width and height put in 100. Make sure the canvas extension color at the bottom is white. Then click ok. Look at the screenshot below as an example:
6. After you click ok, you should see a white canvas behind your picture:

7. Before we go any further with the tutorial, make sure you know where your tape is saved. Saving the tape to the desktop is always an easy way to find it when you need it. I have a folder labeled "digital tape" on my desktop for easy access.
8. Okay, now that you have located your tape, click file > place, and then you'll see the box below:

Notice the two arrows, one labeled A and the other labeled B. I did this so you could see there are two different ways of doing storing your tape. If you have a whole bunch of digital tape, it's a good idea to place them in an organized folder like Example A. If you just have like one or two pieces of digital tape, then you might just save the tape on your desktop like Example B.
If you are using a folder, then click the folder and then click place. You will then be able to browse all your tape and decide which one you want to place on your picture. After you have decided which one you want, then click on the tape and then click place again.
If you just have one piece of tape like in example B, then just click the tape and then click place.
9. Almost done! Yay! After clicking place, a piece of tape will show up on or near your image like the example below. More than likely it will be small, so you will have to play around with it to make it bigger. To do that, hold down the shift key on your keyboard. As you are holding shift, move your mouse to the corners of your tape, and you will see an arrow. This arrow allows you to make the tape bigger or smaller. If you move the cursor slightly off of the corner, you will also see a curvy type arrow. This arrow allows you to rotate your tape. Just play around. Make sure you are holding shift down the entire time you are playing with the tape; this re-sizes the tape in the correct proportions.

Once you have the tape placed where you like it on the image, then click enter on your keyboard.
10. Now you just need to crop the picture and save it. The arrow below shows you where the crop button is located. Click it.

Then click and drag the crop-box to crop the picture {and tape} as shown below. Once you're finished, click enter on your keyboard.

Yay! You did it! Here is my example:

11. Now you just need to resize the picture so it fits nicely in your blog post. To do this, click image on the toolbar and then click image size. The box below will show up. Below you can see what I put in for width & height; these dimensions what I typically use for my posts. You might have to play around with different sizes though. Make sure all the boxes at the bottom are checked and also make sure the box at the very, very bottom says bicubic sharper (best for reduction). Then click ok.

12. Your picture is now re-sized and ready for your blog post. Just click file > save as, give your file a name (make sure it's saved as a .jpg file), and click save.
13. I use photobucket to host the images on my blogs. If you'd like to know how I do that, here is a tutorial for ya! Otherwise host your picture to your blog as you normally would.
Questions or concerns? Just email me. I'd be glad to help out! Also, leave me a link to your blog if you use this tutorial. I'd love to come visit and see how you used the digital tape.
Linking up:

Linking up:


7 comments:
I don't have Photoshop, but my husband-to-be does! I definitely want to play with some digital tape, so thanks for sharing this great tutorial. :)
Hope your day is lovely, Libby! {{hugs}}
Awesome! Thank you so much! I'm going to try this out soon :)
Thank you so much! I just bought photoshop and know nothing. Just tried it and it worked!!! Thank you so much. Love your blog!
Hi Libby, I have been wanting to do this so badly! Thank you! Question: Where do you get the tape to download to your computer?
Haha...nevermind, I just found it. I knew I had to have missed it! Thanks Libby!
Heather
Are you back to blogging now? I really want you to come over and show me everything on photoshop. You are so dang smart at it!!! And do such great tutorials!
I've always wanted to try this! Thanks for the tips!
Post a Comment