Showing posts with label tutorials. Show all posts

February 23, 2011

Blog Tutorial and a Winner!

So, I'm not sure I can exactly call this a
tutorial because, really, there isn't much to it.
But, I thought I'd go ahead and post about it because:

a. It's a blog setting that is just in a weird place.
{I kept looking under the settings tab and could never find it}.

b. I love helping you all beautify your blogs by giving
you the resources you need to customize it to your liking.

c. I want to remember where I found
this setting in case I ever decide to change it. :)

Okay, so the "setting" I'm talking about
is how to customize the comments wording.
If you already know how to do this, then just skip
this first part and scroll to the bottom to see
who won the Hello, Good Gravy giveaway.

Photobucket

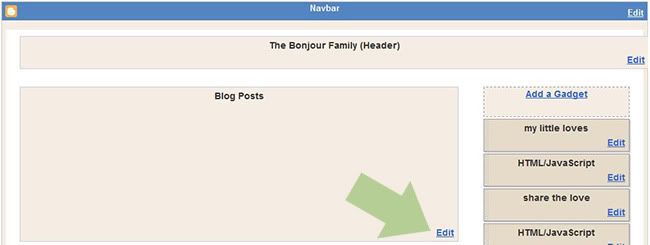
1. Click the design tab
{Your screen will look like the pic below}.

Photobucket

2. In the blog posts box click Edit

3. This box {pictured below} will pop up.
The green arrow is pointing to the box where
you can customize it to say whatever you'd like.

Photobucket

There are a bunch of different
settings in this box, so have fun with it. :)

4. Then click save.

Click here to check out my other blog tutorials.

And last but certainly not least,
we have ourselves a winner of the

Congrats to Angie of The Lingo Family.
I'll be sending you an email. :)

Photobucket

November 19, 2010

9 Steps to a Better Blog Experience

Hello, hello!

I'm headed to work shortly, so this post is going to be short and sweet. :) Today I read a really great post and just wanted to pass it along to those of you who have blogs. The post gives you nine easy steps to make your blog a better experience for your readers. Very informative!

9 Quick Steps to a Better Blog Experience

What do you think?

Photobucket

November 05, 2010

diy chalkboard baskets

I love me a good do-it-yourself project.
So today when I came across these chalkboard baskets
from Little Yellow Treehouse I had to bookmark them!

Photobucket

I'm thinking they would be perfect for Noah's new big
boy room-- once I figure out the theme I want to go with.
Decisions, decisions.

Photobucket

Totally love this idea!
Tutorial & images found here.

Photobucket

October 27, 2010

How to Change your Blog Background

Are you ready for the simplest blog tutorial ever? I'm not even joking. You better love me for this because I am sharing with you one of my deepest, darkest secrets. :) Actually, I gotta give my hubby credit for this tutorial because he is the one who taught me how to do it. Do you ever wonder why I'm constantly changing the background on my blog? Well, I might have a little blog OCD, but changing the background is so easy I can't help it.

I don't know about you, but I quickly got tired of all those free background websites {like The Cutest Blog on the Block, Hot Bliggity Blog, etc.}. Those places are great to start out with when you are new to blogging, but after a while, those backgrounds are just blah. And there is nothing more annoying than having "The Cutest Blog on the Block" hanging at the top left corner of your blog. Does that bother anyone else? Or is it just me and my picky self?

So, do you want to know my secrets to finding great backgrounds? Sure you do.

Step One: I search in Google "free digital scrapbooking kits" and then click the tab "images" so I can see lots and lots of kits all at once. There are a lot of digital scrapbooking sites out on the web that provide background freebies for personal use. There are also scrapbooking kits you can purchase as well, and most cost only a few bucks. I usually stick with the freebies. Anyway, just look around at different kits, and once you find a couple you like, follow the simple instructions for downloading it {usually just a click of a button}, and you'll have some new backgrounds on your desktop to try out.

Step Two: Locate on your computer where you saved your background {I always save on the desktop, so it is easy to find}.

Step Three: Open up your Photobucket or Flickr account and upload the background image from your desktop {or wherever you saved it}. The arrow below is pointing to the background I want to use, so I click it, and then it will upload to Photobucket.

Photobucket

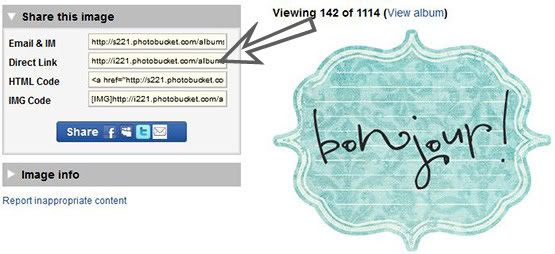
Step Four: Once your background image uploads, you will see the box below to the left of your screen. Copy the Direct Link.
Photobucket

Step Five: Seriously, we are almost done. Can you believe it? Go to Blogger and click the "Design" tab. Under the Design tab you will see three options: Page Elements, Edit HTML, and Template Designer. Click Edit HTML. As a word of warning, any time you are going to be editing the HTML code, you want to back it up first! I always copy it and send it to myself in an email so if I mess up I can get my blog back to the way it was before I started messing with it. So do that right now before we move on.

Step Six: Okay, now that we have that saved, we can work in the Edit HTML tab. Click the tab and you will see something like this:

Photobucket

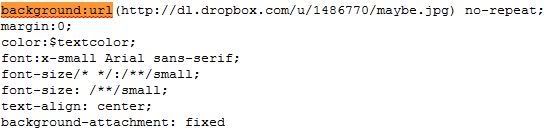
Here is a little trick that will help you find exactly what you are looking for without having to scroll through the whole code. Use the find function: click Ctrl + F, and it will bring up a search box. In the search box, put in these words: "background:url" {without the quotes}, and then click enter. Scroll down the code, and it should look like this:

Photobucket

This area of the code is where we will be working. Promise, this is the very last part.

Step Seven: Okay, now we are ready to paste the Direct Link we copied from your Photobucket or Flickr account. Remember? Right next to the background:url, you will see a set of parentheses. Delete whatever is in them, and paste your Direct Link. Note: Make sure you keep the parentheses. Do not delete them.

Step Eight: Before you save your new background, you can click the Preview button. You can view your blog with your new background and if you like it, then click Save Template. And you're done!

I promise you, after you do one, you will love doing it this way. And you will get quick at it too. It usually takes me just a few minutes to change out a background. There are so many wonderful backgrounds you can choose and aren't as limited as you would be if you were using one of the free background sites.

As always, let me know if you have any questions or if you get stuck somewhere along the tutorial. Happy to help out! Have fun!!

Photobucket

October 09, 2010

How to Create a Photo Collage

I'm drawing a blank tonight. Go figure. So, I thought I would write out a tutorial for you all. Sound good?

Tonight I am going to show you how to create a photo collage! And you will be happy to know, it's a very easy thing to do!

Have you heard of Picasa? I love this program {almost as much as I love Photoshop}. It's a great program that manages your collection of digital pictures, and it can also do some very simple editing.
Photobucket
I use Photoshop for most of my editing, but when it comes to creating photo collages, I prefer Picasa. I honestly think Picasa does just as good of a job creating simple collages as Photoshop. But really, the main reason I love using Picasa to create my collages is because it does all the work for me. :) I'm lazy like that.

So, let's get downloading and start playing in Picasa to create some photo collages!

Click here to download Picasa. And in case you are wondering, it is free!

Now that you have downloaded Picasa, all of your pictures on your computer should automatically load into it. Here is the getting started guide in case you have any questions about Picasa.

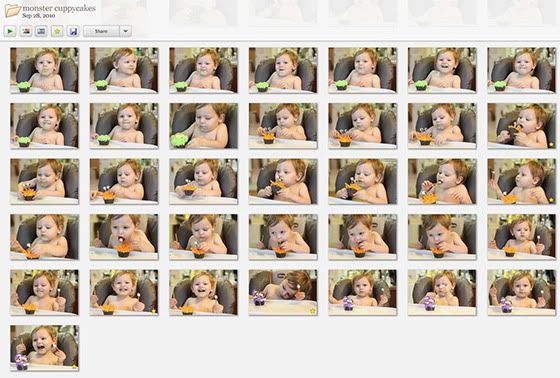
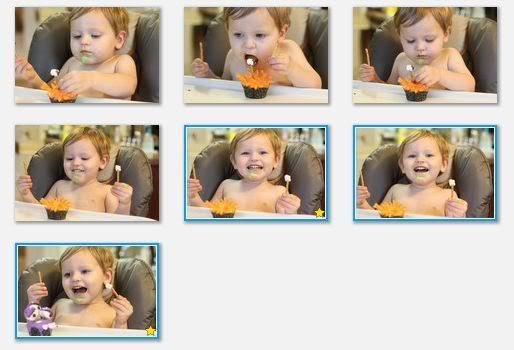
Once you are in Picasa, on the very left side of the window, you will see a list of folders. You can use these folders to organize your pictures by date or name. The folder I'm showing you below is labeled "Monster Cuppycakes." I am going to choose three pictures of Noah eating his cupcakes for my collage. You can use however many pictures you want.

Photobucket

First, click on a picture. After you do that, the first picture will be highlighted. Then you will hit the CTRL button on your keyboard while you click the remaining pictures.

Note: When you hit the CTRL button, don't let go of it until you finish clicking all the pictures you want to use for the collage.

Once you finish clicking all the pictures you want to use for your collage, they will all be highlighted like mine are below. You can then release the CTRL button.

Photobucket

Now that my pictures {and yours!} are highlighted, we are ready to make a collage.

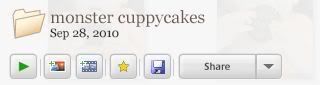
Above all of the pictures, you will see the folder name. Like I mentioned before, my folder name is called, "Monster Cuppycakes." You will see a bunch of buttons under the title of the folder, click the second button {right next to the green arrow}.

Photobucket

This is the "Create Photo Collage" button.

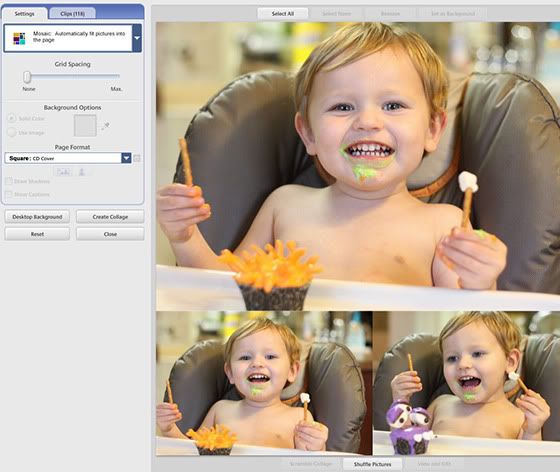
Once you click that button, it will automatically put your pictures into a collage like mine below.

Photobucket

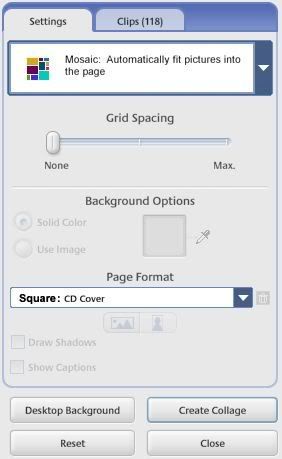
On the left side of your photo collage, there is a "Settings" box. There are many options to choose from in this little box. This allows you to customize your photo collage. Play around with all of the settings. That's the fun part!

Photobucket

Also, under the photo collage, there is a button you can push called, "Shuffle Pictures." It randomly creates different collage layouts with your pictures, and you can click it over and over again until you like how your collage looks.

Removing and Adding Pictures to your Collage:
If you have a picture in your collage that you decide you don't want anymore, just click the picture {this will highlight it} and push the "Remove" button located above the collage.

If you want to add more pictures to your collage, click the tab "Clips" in the Settings Box. Then you can click "Get more..." and it will take you to the folders where you can pick different pictures.

Once you are done playing with the settings and you are happy with your collage, then click the button "Create Collage" which is located in the Settings Box.

After Picasa has created the collage, it automatically exports it into an image. On your computer, locate your "Pictures" folder, and find the folder labeled "Picasa." Then there should be a folder labeled "Collages." Click that folder and you should be able to find your collage there.

Then you can upload the collage to either Photobucket or Flickr {whichever you prefer}. You may need to resize your collage before you put it into your blog post. This tutorial will help you learn how to resize images if you don't know how.

Here is my finished collage!

Photobucket

If you have any questions, don't hesitate to leave me a comment below or send me an email. I'm happy to help!

Have fun creating your collages! I can't wait to see them.

Photobucket

p.s. The Hidden Cupcake Giveaway is now closed! A winner will randomly be selected and announced sometime Monday {October 11th}. Thanks to all who entered and good luck! Oh, and there is a new menu up for this week. :)

October 07, 2010

Halloween Favorites

Photobucket
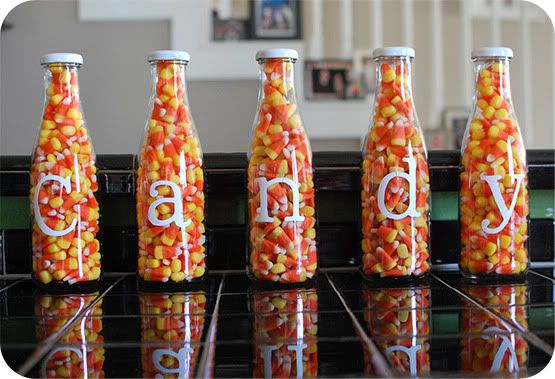
I love this simple, inexpensive way to display your Halloween candy
created by Kelli of Random Thoughts of a Supermom. Check it out here.

Photobucket
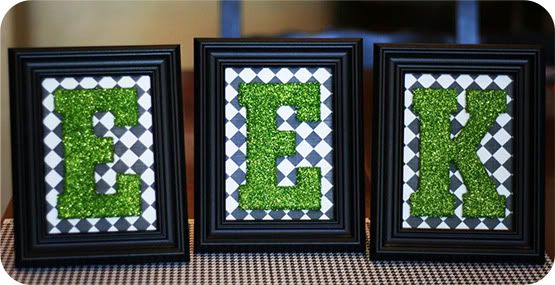
eighteen25 came up with these frightfully fun frames-- aren't they adorable?!
Check out their blog and see how they made them.

Photobucket
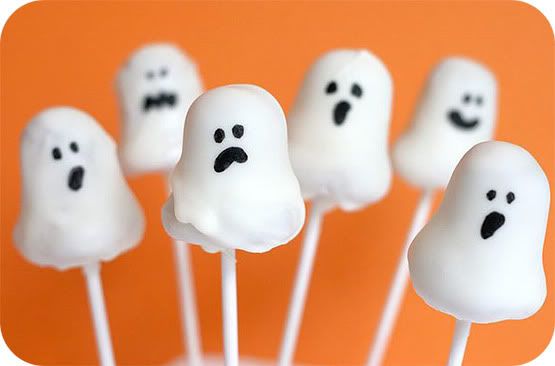
Ahhh Bakeralla and her ghost cake pops. Need I say more? She's amazing!
Now you can make them too with a little help from her new book Cake Pops.

Photobucket
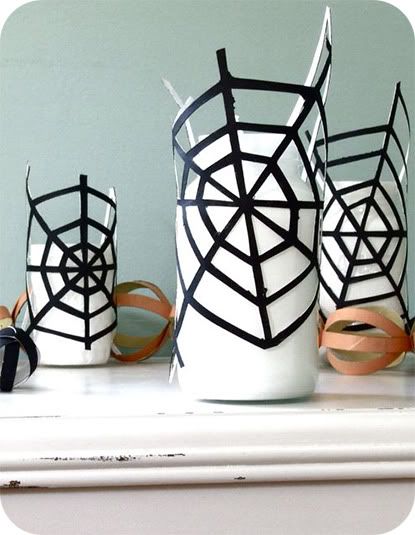
Take this quick and easy tutorial with Michele from
Michele Made Me to learn how to make a web/spidery lantern.
What a cute, creative idea!

Photobucket
This next idea is off the charts cuuuuute from it is what it is!
Plop a few stickers from Michael's on top of some Reese's
and you got yourself some cute Halloween candy favors.
Download the custom tag for free!

Photobucket
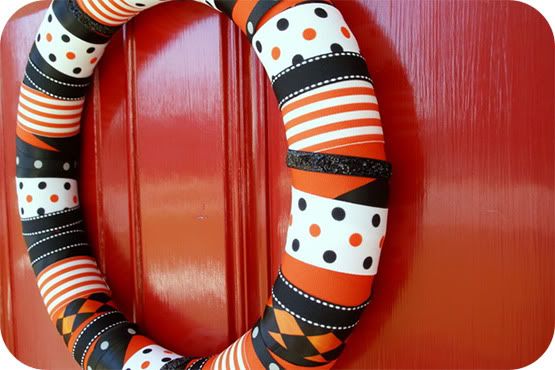
I heart this Halloween inspired Ribbon Wreath very much. It is oh so perfect
in every way! I want one for my door! Kristi from The Speckled Dog created
this wreath with a little inspiration from "The Boo Wreath" in the Oct/Nov
issue of Simply Handmade.

Photobucket
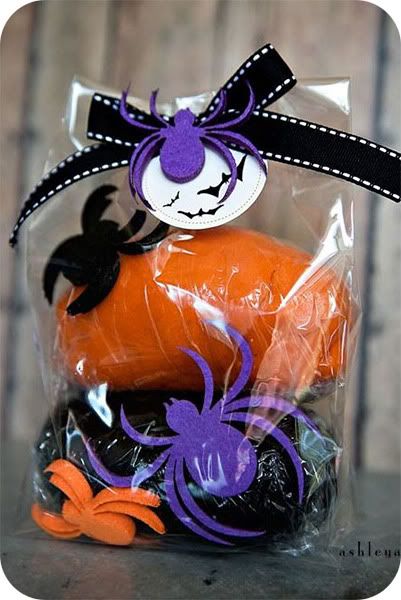
Ashley from Under the Sycamore {definitely a favorite read of mine!}
makes up a batch of Halloween Play Dough to give out as gifts as an
alternative to candy. See how she does it here. LOVE this idea!

Photobucket
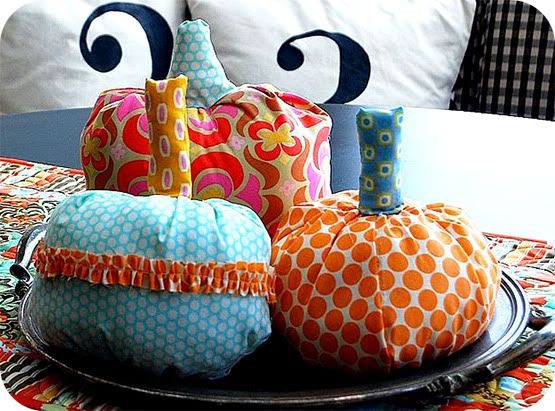
Learn how to make these adorable ruffled fabric pumpkins
with Jen at Tatortots and Jello.

Photobucket
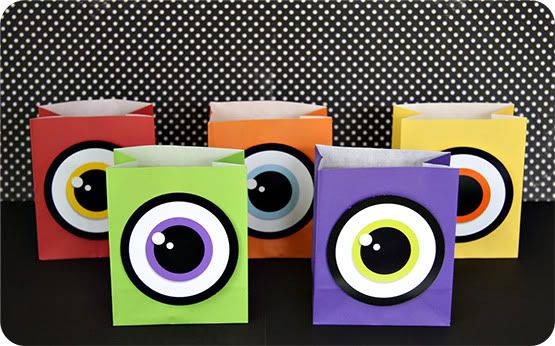
Another monster idea... I just can't resist them! Make these
one eyed monster treat bags with Beth at it is what it is.
Download the eyes for free here.

Photobucket
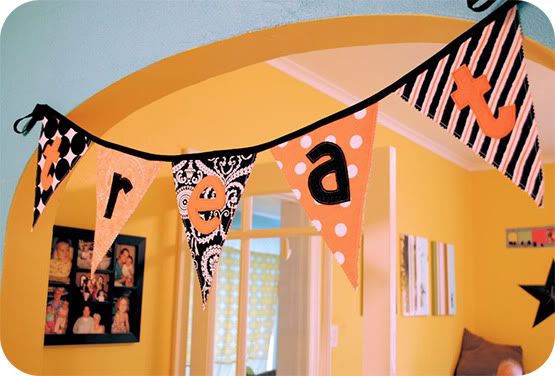
This Halloween reversible Trick or Treat bunting banner is fabulous! I love how
you can see "treat" on one side and "trick" on the other. Such a cute idea!
Check out Jen's adorable blog here.

Photobucket

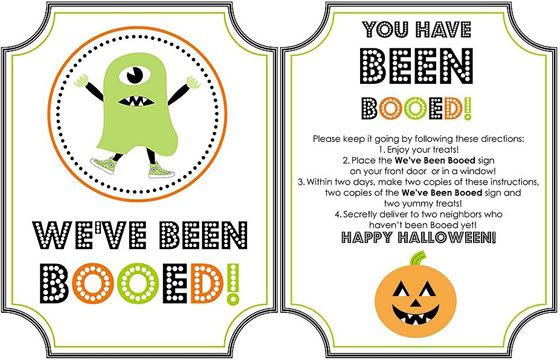
If you don't know who Kim from The TomKat Studio is, then you are missing out!
She is one creative and very talented woman! You must go check her blog out!
I love the idea she came up with: We've Been Booed! Read about it here.

She created the cute printable templates you see above for you to print out!
Told you she's amazing! Click here to get this fun freebie!

All of these ladies are so talented. What great ideas!
Which one is your favorite?

Photobucket

October 01, 2010

Basic HTML Help

Here I am with some more blog help! I have been asked several questions, so I thought I would go ahead and answer all three in one tutorial. Sound good? Okay, let's get started.

How do you cross out a word in blogger?

You use this simple bit of html code:

Photobucket

Click edit html {the tab next to compose} and add the code where you want to cross out a word. For example, the word I want to cross out is Blogger, so I'll put the word Blogger between the two words strike, like this:

Photobucket

Once you've done that, it will look like this: Blogger

That was easy, huh? Want more? Okay, let's keep going.

How do I link to a blog or website in my post?

Okay, see the little green, world-looking icon on the very left? Good. Remember that icon.. we will talk about it again.

Photobucket

The tool bar you see above, is located right below the title of your post.

Before we talk about linking, go ahead and copy and paste the url {for example: www.playgrounder.com} of whatever you want to link.

Now, select the word or words you want to make into a link. Once you have highlighted the word(s), then you will click that little icon we talked about a few minutes ago {you know, the little green world}.

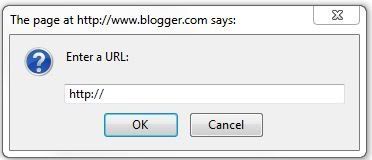
When you click the icon, this box will show up:
Photobucket

In that box, copy and paste the url you want to link and then click ok.

You now have a link! Also, once you have your link, highlight it, and click the icon to the very left of your green world {the one with the T and a bunch of colors}. Pick a color {I usually pick blue just because that is the color most commonly used for hyperlinks}, and now your link will be a different color than the rest of your text in your post.

Now that I have made my link, how do I get it to open up in a new window/tab?

This is not something you have to do, but I always do it so that when people click on a link in one of my posts, they don't leave my blog. I mean, do you really want your readers leaving your blog for another site and not coming back? Of course not! Opening a link in a new window/tab just makes it easier for a reader to get back to your blog. Does that make any sense?

Let me just show you.

The code I am about to give you will be your new best friend. I use it all. the. time. The code to open up a new window/tab is: target="_blank"

It's a simple little code, isn't it?

Here is a random sentence I used in a previous post where I used this code:

"So, get your craft on and click here for all the fun."

This is what this sentence looks like under the edit html tab:

Photobucket

See the code in there? It looks like this: "target="_blank"

So, when you want to add this code into your sentence, look for the word that is linked {in the sentence above it is here}, and then copy and paste target="_blank" right in front of the link.

Seems a little complicated at first, but it is not at all. It's very easy, and it really does make a big difference when your readers click your links.

Once you click the compose tab and then preview below it, you will be able to click the link and it should open up a new tab.

I think we will leave it at that and let you work on these things before we move on to other stuff. Let me know if there is anything specific you would like me to cover. Don't be shy. I need more tutorial ideas.

Have a lovely day, and make those blogs pretty!

Photobucket

p.s. I am guest blogging at Funky Polkadot Giraffe around 5 pm today {Oct. 1st}, so come on over and visit. Kyla has been having a blog par-tay this week, full of giveaways and tutorials. You don't want to miss it! Also, check out her awesome cupcake blog! {I'm over there too!}

September 23, 2010

Custom Blog Signature

Today I have an easy tutorial. And guess what!? You don't have to use Photoshop for this one {unless you want to}!

Okay, let's get started.

Click on this link before we move on. You there?

At the very top of the page, there will be a tab that says, Start Now. Click it. You will then click the very first button you see that says, Create Signature. There are several easy steps to follow to create your signature:

1. Enter your Name
2. Choose a font
3. Select the size
4. Choose a color {if you want}
5. Set the slope of your signature

Go ahead and go through each of those steps. I'll wait for ya.

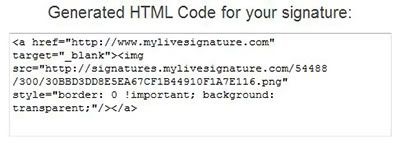
Okay, now you should be at a page where it says at the top, Finished! The signature is ready. There will be three options for you to choose. Click the last one that says, Want to use this signature. Then you want to choose the Generate an HTML code option. Next you will see, Generate a code for my handwritten signature. Click it.

You will now have a code that looks like this:

Photobucket
Copy the code.

Now, let's head on over to blogger so we can put your pretty little signature into your posts.

Photobucket

Click the tab Settings; then click formatting.

Scroll down to the very bottom of the page and you will see Post Template.

Paste the code you created in the box next to Post Template. Click Save Settings. Don't forget that step!

Now you have a pretty new blog signature that will appear each time you write a new post.

Pretty easy, huh?

I need some more tutorial ideas. What would you like to know?

Photobucket

p.s. Promise Noah posts soon!!

August 29, 2010

Blog Button

I'm back with another blog tutorial. Aren't you excited? I am going to teach you today how to make your very own blog button. And really, it is a simple thing to do. Seriously, if I can do it {without the help of the hubby...yay me}, then you can too! The only thing is, you must have some sort of graphics program such as Adobe Illustrator or Photoshop to make one {unless there are other programs out there that I am unaware of}. Photoshop is my baby. So we will use it for this tutorial.

"What is a blog button for?"

Good question! So glad you asked.

Basically, blog buttons are made to help promote your own site on other blogs. Another reason to have a blog button is to advertise your company {such as an etsy shop}.

Here is my little ol' blog button; I created a few weeks ago. It's kind of simple, but I really like it.
Photobucket
So, are you ready to make yourself one?

Let's get started.

1. Create Your Canvas:
A typical size is 150×150 pixels, but you can make it whatever size you like. I made mine 200x200 pixels, and it was a perfect fit on the side of my blog. Just play around with the size until you find the right size for your blog. I'll share one of my little secrets with you. I didn't create the cute little canvas below. I googled "free digital scrapbooking kits," found a cute one, downloaded it, and then opened up this pretty little design in Photoshop.

Photobucket

2. Add Text:
Decide what you want it to say, and keep it short and sweet so that it is easy to read. Create a text box and then type your text inside.

Photobucket

Then choose a pretty font. You can also change the color of your text if you'd like. I wanted my button simple and very easy to read, so at this point, I was done!

Photobucket

Note: You can also add a photo or an illustration to your button if you want a little more detail. Once you select a photo or image, place it in the box, and then play around with the words and the image until you like the way it looks. Once you are finished and like the way your button looks, save it as a .gif image. This is a very important step, because if you save it as a jpeg, it won't work.

Okay, so now that you have your button created, upload it to either Photobucket or Flickr {whichever you prefer}.

Now, let's learn how to create the box under the button with the link in it and also how to place it on the side of your blog.

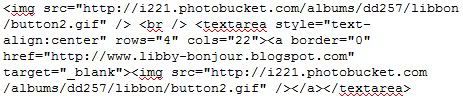
Here is the code you will need:


1. You are going to replace "http://YOURBLOGADDRESS.com" in the hyperlink reference above with the URL of the webpage you want your button to link to. Make sure you put it inside the quotes.

2. Go back to Photobucket or Flickr {wherever you uploaded your button image} to get the direct link to your image.

Photobucket

3. You will now replace “http://YOURBUTTONLOCATION.jpg” in the sample code above with the URL to your image {the direct link you copied}. You will do this twice, as you can see there are two "http://YOURBUTTONLOCATION.jpg" in the sample above.

Here is an example of what my code looks like:

Photobucket

Now you are ready to insert your new button on your blog sidebar!

1. Go to Blogger:: Edit Layout
2. Click "Add a Gadget"
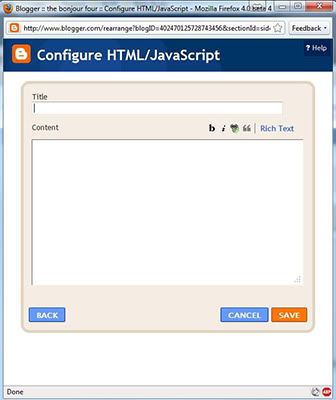
3. Add a HTML Gadget {4th one down from the top}. It should look like this:

Photobucket

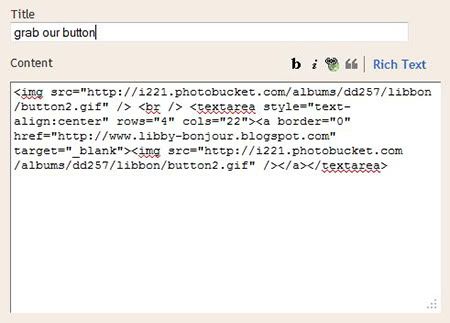
4. Now copy your code and paste it like this:

Photobucket

5. Click save and you should have a pretty little blog button on your sidebar. Yay!

Shoot me an email if you encounter a problem! Like always, I will be more than happy to help you figure out what went wrong.

Now go get busy and make some pretty blog buttons!

Photobucket

p.s. Thank you Gina for sharing the blog button code with me!